Removing Blemishes Without Over-Smoothing Skin with Aperty
October 21, 2025
For portraits, smoothing the skin and removing blemishes is an essential skill for photographers and editors. There may be a make-up artist on set and the lighting may be perfect, but there will still be work to do in post. Uneven tones across the face, blemishes on the skin, and unwanted shine can all appear once you start reviewing your photos.
Personally, I have always found this task quite tedious when done manually, and there is such a fine line between getting it right and going too far, resulting in over-smoothed, unnatural-looking skin that ruins the quality of the photo. It is worth mentioning that despite your best efforts during the shooting stage, a bad edit can undo all of your work, especially when it affects the most important part of a portrait: the model.
Along comes Aperty, here to save the day for photographers like me who find manual editing far too tedious and would much rather be shooting. We are going to take a look at this portrait-specialist software, how it can save you time, and how it can deliver professional-quality results with ease. Let’s get started.
What is Aperty
 If you’re not familiar with Aperty, here’s a quick rundown on this photo editing software. The special thing about Aperty is that it is dedicated to portrait editing. So for those photographers who specialise in shooting models, or even for those considering to get started this app may be of interest to you. That’s because no matter your level, you can get professional-looking portraits with just a few clicks.
All those tedious tasks that take up a lot of a portrait photographer’s time can now be done with ease. Aperty is powered by AI technology that can read your images and make adjustments for you.
Automatic Skin Smoothing & Detail Enhancement
Try Aperty NowHow to Remove Blemishes with Aperty
With Aperty, you can fix blemishes quickly and naturally. Follow the steps below to achieve clean, polished results without losing authenticity.
Step 1: Getting Ready for Retouching
Before I do any kind of retouching work, I make sure I am happy with the overall image by adjusting the exposure, contrast, and other basic settings before moving on to the model. The reason for this is to get a clear idea of what can be achieved with the image and to ensure the balance of tones is correct. This sets a solid foundation for the rest of the edit, making sure the model looks natural and cohesive within the overall composition.
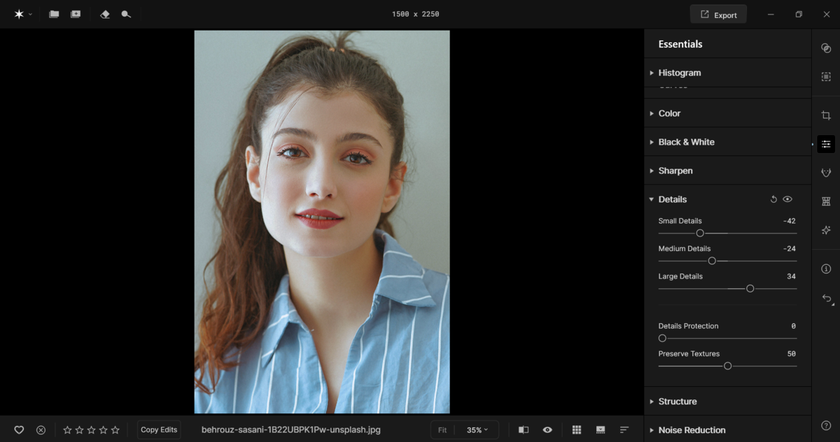
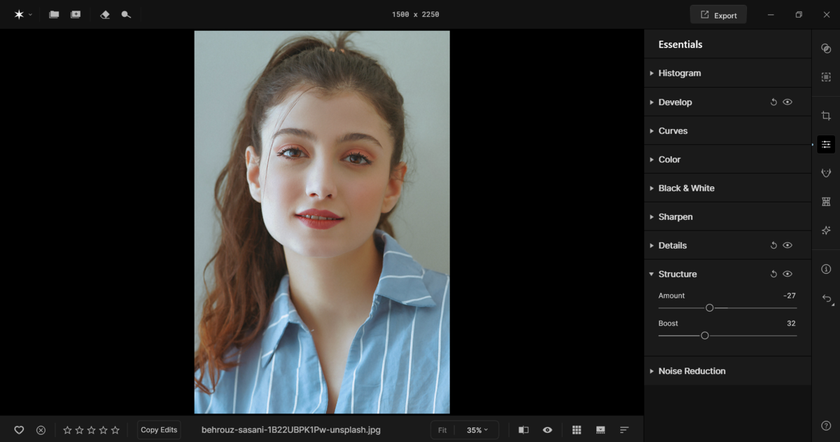
Jumping into the Essential tools in Aperty, I correct tones using the exposure and contrast sliders or by working with the tone curve. I also enjoy using the Details and Structure tools at this stage.
 The Details tool allows you to break your image down into small, medium, and large details, while the Structure tool lets you bring more clarity and texture to your image. If you work on blemishes and skin smoothing before adjusting detail and structure, you may find that the added clarity can undo your earlier smoothing work.
Once you are happy with your overall image, it is time to start retouching. Let’s take a look.
Step 2: Smoothing Skin and Removing Blemishes
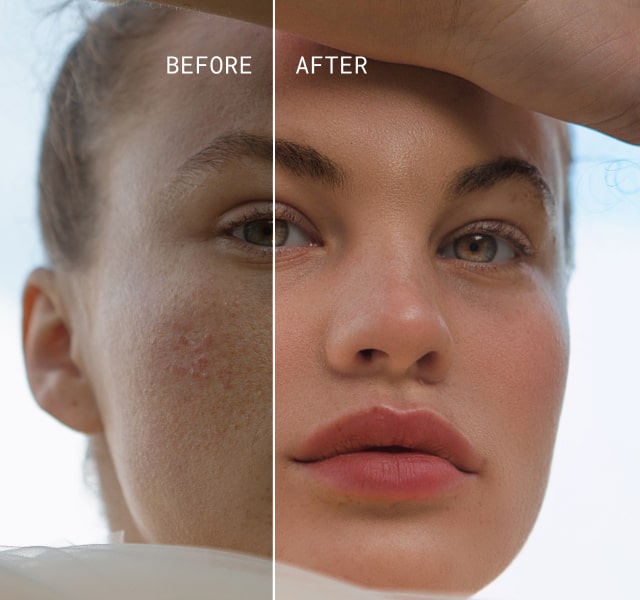
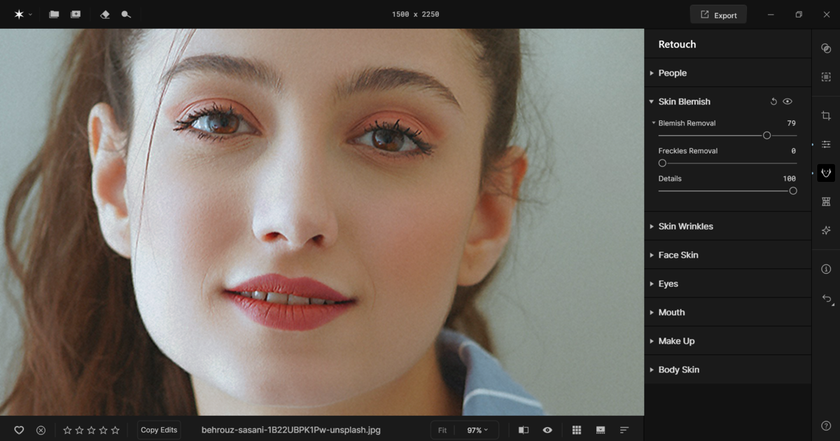
Jump into the retouching tools and head down to Skin Blemish. Here we have tools that use AI to read the face of your subject and make changes with just one click.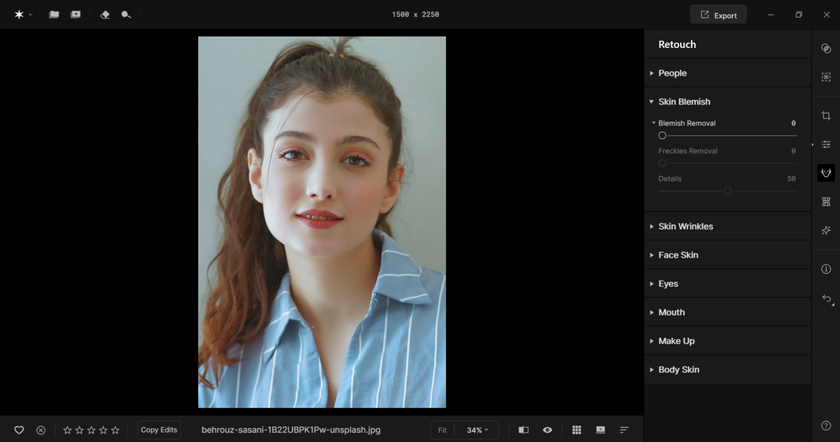 What we are ultimately aiming for here is a balance. We need to get the skin smooth but it still needs to look realistic enough. If we push the dial too far we end up with that over-processed look that can be quite jarring for the viewer and ruin the quality of the shot.
When I first started out editing portraits I found this quite difficult initially, however, I came up with a few tricks before it became natural. More on that later.
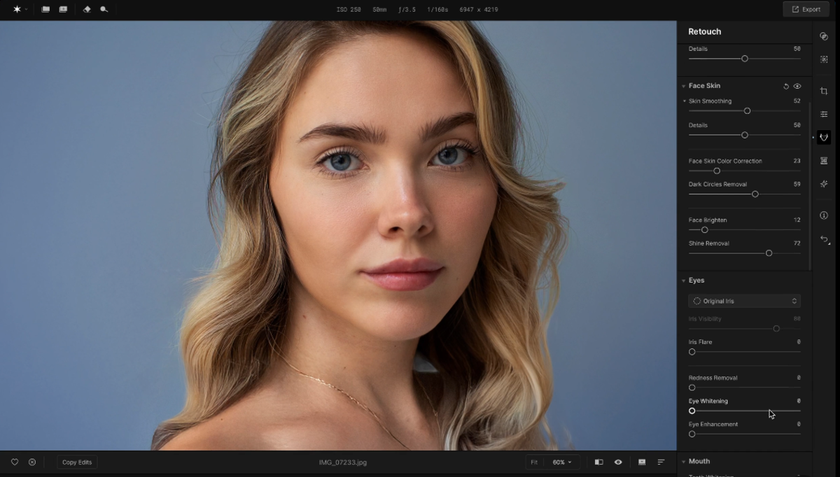
For now, inside of Skin Blemish, you’ll notice that we have a Blemish Removal slider alongside a Detail slider which is going to be key here to getting a realistic look. Aperty’s aim is to smooth skin and remove blemishes while preserving natural textures. These textures are integral to avoiding over-processing. 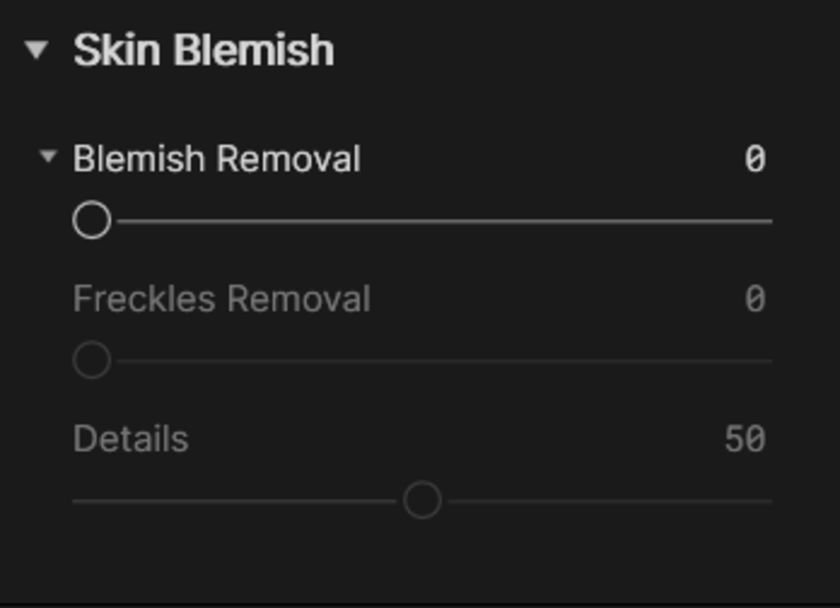 Every model’s complexion is different, so increase the Blemish Removal slider to what is suitable for your model. Zoom right in problem areas in the skin and push the value until they begin to disappear. Once you’re happy with the level of blemish removal, go to the Details slider. By default, this slider is at 50 so you may already notice that a good deal of natural skin textures have been preserved. However, if you needed to apply blemish removal heavily then you may need to increase the details slider.
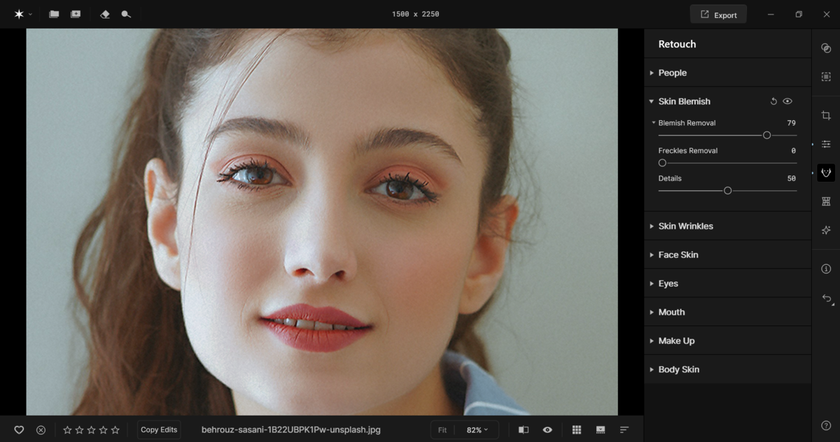
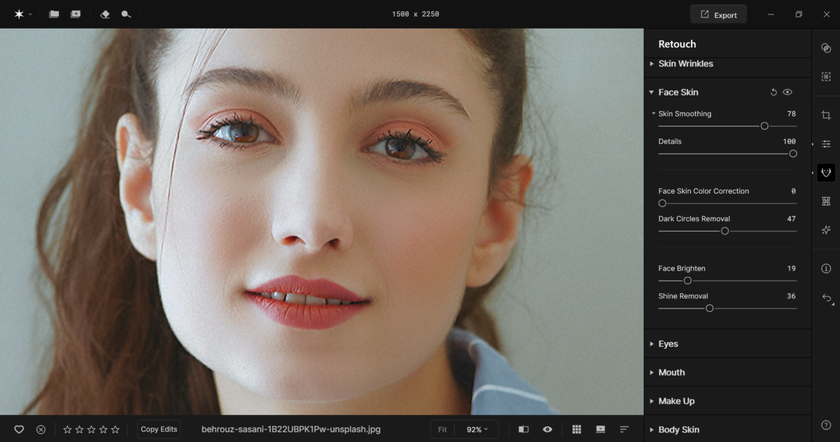
The same goes for the Skin Smoothing tool. Inside of the Face Skin menu, you can smooth over the pores of your subject and even out tones. This will help hide blemishes and give your image a professional-quality. If you find that your model needs the sliders pushed heavily, you need to correspond with an increase with the Details slider.
 Remember, it’s all about preserving natural textures. But for beginners this kind be hard to spot, so let me show you a few tricks I developed to avoid the over-processed look.
Step 3: Notice When You’ve Gone Too Far
One of the tricks I use to tell if I have gone too far with my edit comes from my street photography work. I typically work with neon night scenes and aim to create colourful and vibrant pieces, but there is a fine line between colourful and over-saturated. To know if I have pushed the edit too far, I take a step back from my work.
Once my edit is complete, I do not share it straight away. Instead, I wait a day or two and then look at the image with fresh eyes. If the image is over-saturated or has any glaring issues, they immediately stand out. It is surprising how easily you can overlook problems when working too closely on something, and the same applies to portrait work.
Work on your photo until you believe it is finished, with all the essential adjustments and retouching complete. Then revisit it the next day. Does the skin look natural, or does something feel off straight away?
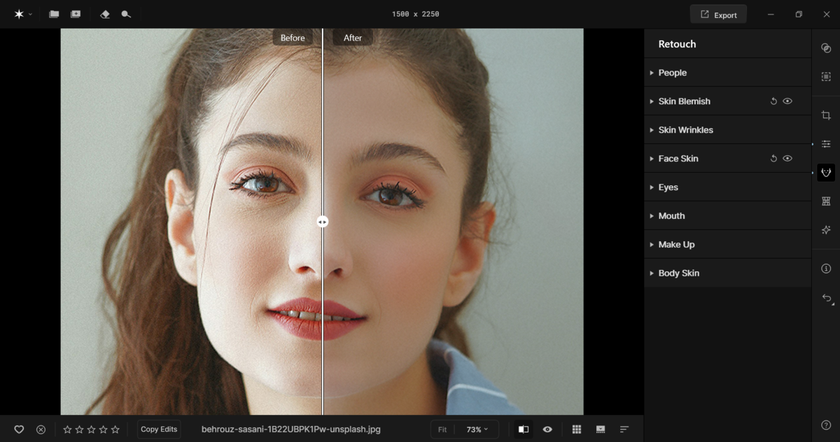
Another useful check is to zoom in and make sure the natural textures are still visible. Use the Before and After toggle to see how the skin has changed and whether it has lost any realism during the edit. You can also compare your work to that of photographers you admire and study how far they go with their edits. Zoom in on their images and look at how their textures and tones appear in the final result.
 With practice, this becomes second nature, and you will quickly recognise when you have achieved the right balance. Even after all these years, I sometimes leave a piece for a day or two if I am unsure. A fresh set of eyes makes all the difference.
From Subtle to Bold – Test Makeup Looks Without the Mess
Try Aperty NowThe Bottom Line
Aperty is a game changer for portrait photographers. Its ability to deliver professional-quality images with ease will help you level up your work and, better yet, attract more clients.
To achieve that professional look, you need to understand how to retouch your photos while keeping the results realistic. Aperty helps you smooth skin and remove blemishes while preserving natural texture, and this effect can be enhanced by using the Details tool alongside your adjustments.
If you are unsure whether you have found the right balance, take a step back from your work for a day or two and review your shots with fresh eyes. It can make a huge difference and help you on your way to creating the kind of work that brings in dream clients.
So give it a try and enjoy working with Aperty.