Post-Production In Fashion Photography: Editing Like A Pro
March 26, 2025

Post-processing in fashion photography is a distinct skillset, separate from fashion photo-taking. It's an essential part of the process, allowing you to refine and polish your photos to achieve the professional standard expected for commercial, magazine, and lookbook shots. Over the years, photographers have used various software programs to complete tasks such as skin retouching, body shape adjustments, and blemish removal. Fashion photographers even develop a signature visual style through their edits, rather than solely through the camera.
Many new photographers are daunted by the extensive and sometimes complex workload that fashion and portrait photography entails. Consequently, they often need to study considerably before achieving desirable results with their edits, or they may never quite reach that level.
Thankfully, there's now an alternative, a saving grace, if you will, that allows photographers to achieve amazing results quickly. This frees up more time to focus on what they love most: capturing beautiful fashion photos. Enter Aperty, a new portrait-specialist software from Skylum, which leverages the power of AI technology to deliver stunning, natural results simply and easily. In this guide, we'll harness Aperty's capabilities and take you through a step-by-step process to achieve exceptional results with this software. So, let's get started.
Aperty: A Closer Look
 So, what exactly can Aperty do? To put it simply, it handles much of the heavy lifting that typically consumes a painstakingly long time. Drawing paths, searching for and removing blemishes, and adding multiple layer masks are all automated with Aperty. It recognises individual body and facial parts, allowing you to adjust them to your preference! Let’s take a closer look at how it can assist you.
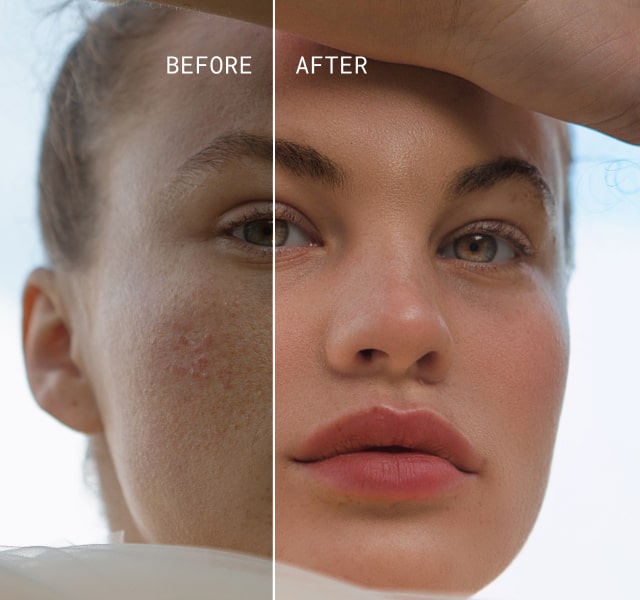
Skin Smoothing: Achieve flawless skin effortlessly while retaining natural textures.
Blemish Removal: Automatically searches for and detects blemishes, removing them while preserving natural textures.
Feature Highlighting: Eyes, teeth and lips can be enhanced with precise control over each facial element, making them more striking and captivating.
Make-up Application: Apply or improve make-up with Aperty. Achieve natural-looking results with blush, contour, eyeliner application, and more!
Reshaping: Adjust facial points and the size and shape of the abdomen, yielding natural-looking results.
Creative Lighting: Add creative lighting to your image, replicating studio lighting effects. Experiment with positions and hues for surprisingly lifelike results.
Portrait Bokeh: Achieve creamy bokeh in post-production, allowing you to explore various aesthetic options for your image.
LUTs: Apply stylistic looks with LUTs, enhancing the mood of your image.
Facial Recognition: If your shot features multiple people, Aperty recognises individual faces, enabling you to apply consistent adjustments to each subject, saving you time.
Batch Editing: Save even more time with batch editing. Aperty is designed to deliver natural and professional results as efficiently as possible.
As you can see, Aperty offers significant benefits for portrait and fashion edits, enabling photographers to achieve quick turnaround times and return to what they love most: shooting!
Fashion Photography Editing: A Step-by-step Guide
 Now that we have a good understanding of Aperty's capabilities, let’s begin our edit. Follow this step-by-step guide to achieve professional and stunning results with your fashion photos.
Getting Set Up
Import Images: Begin by selecting "Create Project." Click the folder icon at the top of the screen to add all the images from your shoot to a single album, keeping your workspace organised. Once the project is created, you can add images to the folder to begin editing.
Essentials
The first step is to establish a solid foundation for our edit by ensuring balanced exposure and sufficient image depth.
Develop: Correct any white balance issues using the temperature slider. Adjust to create a cooler or warmer look as desired.
Light: Balance the image by boosting shadows and reducing highlights. Ensure skin textures are preserved during these adjustments. Apply contrast to create depth, but avoid overdoing it to maintain a high-quality look.
Curves: Fine-tune your image by adjusting curves to deepen or boost shadows, midtones, and highlights.
Details: Bring out textures in the skin and fabric by separating details into small, medium, and large categories, allowing for selective enhancement of specific areas.
Retouch
Now, we can refine the skin to achieve a flawless look, a key aesthetic in fashion photography.
Blemish Removal: Aperty automatically recognises blemishes. Adjust the tool's strength and selectively remove freckles if needed.
Face Skin: Smooth the skin while preserving natural textures using the Skin Smoothing tool within "Face Skin." Adjust the Details slider to control texture preservation.
Face Skin Colour Correction: Correct facial hues without affecting the rest of the image and remove under-eye dark circles effectively.
Face Brighten: Draw attention to the face by adjusting the brightness with this tool. You will also be able to reduce any shine from the face here, too.
Eyes: Intensify eyes by brightening the whites, enhancing iris details, and even adjusting iris colour for natural results.
Mouth: Brighten and whiten teeth for a dazzling smile!
Make-Up
If you didn’t have a make-up artist on set, or wish to improve make-up, Aperty provides powerful tools.
Blush: Apply blush to cheeks or cheeks and nose, adjusting tone, strength, and position.
Contour: Define facial features with natural-looking contouring.
Highlights: Pair contour with highlights for a more defined look.
Eyeliner: Apply and adjust eyeliner strength and hue to complement the subject’s outfit.
Lips: Apply lipstick, adjusting strength and shade to match complexion and outfit.
Body Skin: Smooth body skin textures while preserving natural details, separate from facial adjustments.
Reshape
Create more flattering looks by adjusting body and facial shapes and sizes.
Face: Slim the face while maintaining natural results.
Eyes: Adjust eye shape.
Eyebrows: Adjust eyebrow shape and height for a more defined look.
Nose: Adjust nose shape and position.
Body: Adjust body shape by narrowing or widening and target the abdomen specifically.
Creative and Colour Correction
Now, we move on to the final stages of a fashion photography edit: colour correction. This is where we stylise your photo and enhance the colours within the image. For commercial shoots, precise colour accuracy for the subject’s outfit is crucial.
No Limits, Just Creativity – Pick a Plan & Start Editing
See PlansCreative - Light Control: Within the Creative menu, you'll find Light Control, which replicates studio lighting. Add additional light sources to your image, adjusting position, strength, and hue to achieve a stylised look.
Creative - LUTs: Instantly apply a style to your shot with the LUTs tool. Explore the available LUTs or browse the marketplace to find looks that suit your aesthetic.
Essential - Colour: To adjust all tones in your shot, use the Colour tool within the Essential menu. Here, you can fine-tune the hue, saturation, and luminance of the image's tones. This is particularly useful for ensuring accurate colour representation of your subject’s outfit.
Fashion Photography Editing Top Tips
 To give your fashion photography edits that professional edge, consider these top tips during your next editing session.
Less is More: In photography editing, less is often more. Overapplying contrast, saturation, and other processes can create an unnatural look, compromising the integrity of your shot.
Draw Inspiration from Professionals: Observe how professional photographers edit their images. Notice the flawless skin, cohesive colours, and overall clean aesthetic. Identify standout traits and attempt to replicate them.
Colour Cohesion: Building on the previous point, ensure all colours adhere to colour theory principles. Study colour theory to understand which colours complement each other and which may clash. Eliminate any conflicting colours using the Colour tool, adjusting hue, saturation, or luminance.
Highlight the Outfit: Fashion photography revolves around the subject's attire, so it must be attention-grabbing. Enhance it in post-production by accentuating textures with the Detail tool and refining colours with the Colour tool. However, colour accuracy and realism are paramount, especially for brand work.
Maintain Consistency: When editing a photoshoot, strive for consistent style across all images. Inconsistent edits, such as a mix of muted and vibrant tones, can be jarring. Developing a consistent editing style across multiple shoots contributes to a signature aesthetic, which can attract brand collaborations.
The Bottom Line
And there you have it. For your next fashion photography editing session, consider using Aperty to achieve professional results efficiently. You'll avoid spending hours drawing paths and creating masks, thanks to the AI technology that handles the heavy lifting. You'll also benefit from preserved natural textures, ensuring a cleaner, more refined look for your images.
Above all, you'll be able to deliver professional photos to clients with a quick turnaround, freeing you up to book your next shoot. A stronger portfolio with professional-looking shots will also attract larger brands seeking your services.
So, give Aperty a try, experiment with various looks and styles, and most importantly, enjoy the process!
